@jrmckins shared a very common home automation example in his blog last year: turning on a light for a while if someone is at the door. Presence sensors are tricky because they only ever send one event. With Apilio’s latest changes to our conditions, you’ll be able to “reset” what your presence sensor is telling you to make your routine really smart.
The setup is as follows:
- If it’s between Sunset and Sunrise (it’s dark outside)
- and if motion is detected at the front door
- then turn on the porch light
- otherwise, if no motion is detected after 5 minutes
- then turn off the porch light
We absolutely love seeing examples like these because it really drives the evolution of Apilio: we want to help you setup sophisticated routines, as quickly as possible.
Presence sensors and timeouts
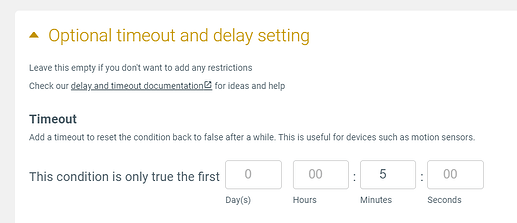
Presence sensors have a problem: they only send information when they detect something, so when nothing is happening, there is no information to react to. Systems like IFTTT and other home automation platforms rely on events to drive the automations. With Apilio, you can setup a Condition with superpowers: we will add a timeout to our condition so that we only consider a presence detected for 5 minutes maximum (you decide how long it lasts). It’s like resetting your presence sensor!
Hardware ideas for this setup
- Any smart light bulb, for example:
- Lifx: https://ifttt.com/lifx
- Philips hue: https://ifttt.com/hue
- Tuya - How to connect your Smart Life account with Apilio
- Any presence sensor or smart camera or door bell. For example:
- Ring doorbell: https://ifttt.com/ring
- D-Link motion sensor: https://ifttt.com/dlink_motion_sensor
- EWelink camera or motion sensor: https://ifttt.com/ewelink
Routine components to setup online
- In Apilio I created:
- 1 time condition: between Sunset and Sunrise
- 1 variable and linked condition: presence detected
- 1 logicblock with 2 actions to turn the light on and off
- In IFTTT I created:
- 1 or 3 applets: one sends the sensor information to Apilio’s variable, and two take care of the actions to turn the light on/off. If you use our Tuya integration, you won’t need the 2 IFTTT applets to turn the light on/off.
Step-by-step setup
First Condition and trigger: someone is at the door
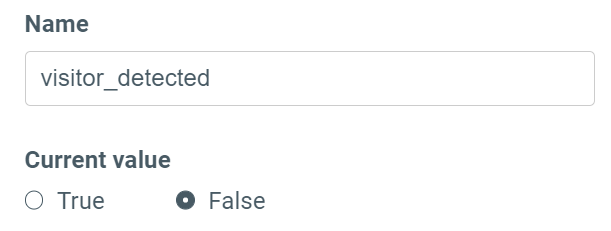
I will have a variable that gets updated whenever a presence ![]() is detected.
is detected.
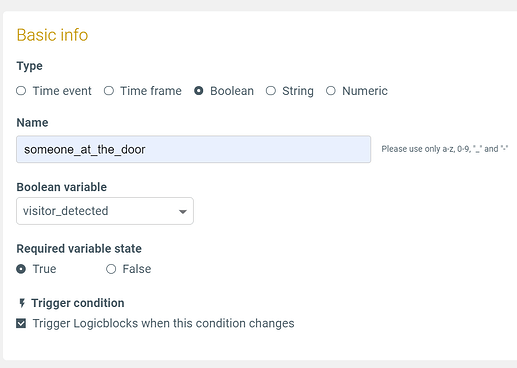
I will then setup a Condition that will be watching what this variable is doing. Leave the checkbox selected as shown to make this a trigger. This is actually something very cool you can do with Apilio!!
My Condition is actually what’s driving the whole setup: The Condition is only true for the first 5 minutes after the sensor detected something, after that, it goes to false automatically. This is how you set this up:
![]() When the condition changes from false to true (someone is at the door, so the variable receives the info from IFTTT), or from true to false (it’s been 5 minutes and we haven’t detected anyone at the door again) we will run our Logicblock.
When the condition changes from false to true (someone is at the door, so the variable receives the info from IFTTT), or from true to false (it’s been 5 minutes and we haven’t detected anyone at the door again) we will run our Logicblock.
Using the condition as trigger makes your logic run based on what your sensor has detected, plus the little reset correction we are introducing with Apilio. Sweet! ![]()
Second condition: it’s dark outside
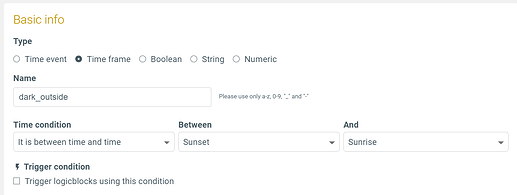
This is created in Apilio natively, and we won’t be using this condition as a trigger, so keep the last checkbox unselected. We’ll use this as our second condition: only if someone is at the door and is dark outside, then we want to turn the lights on.
My logicblock
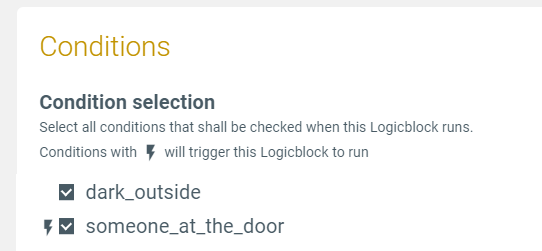
Select the two conditions you created:
![]() You will have one positive action: turn on the light.
You will have one positive action: turn on the light.
![]() You also need to setup one negative action: turn off the light.
You also need to setup one negative action: turn off the light.
Negative actions run when the condition check is not true: if both my conditions are not true, then my negative actions will run. When the presence sensor times-out after 5 minutes, this Condition will be false. My Logicblock will run and, as the conditions are not met, the negative actions will run, turning off my light.
Finish connecting the actions
Create two applets in IFTTT:
- In the “if this” part, select Apilio and the event turn on the light or turn off the light
- In the “then that” part, select the smart light you want to use, and turn it on or off
Or find them in the list of existing applets that Apilio has created, search for your brand of lights and Apilio in IFTTT.
![]() let us know if you have used this idea to improve your home.
let us know if you have used this idea to improve your home.
Related articles
- New here? This is what Apilio is all about: Getting started - An introduction to Apilio
- Delays and timeouts in detail: How to setup time constraints for Conditions: delays and timeouts
- These applets don’t count towards your 3-applet limit: IFTTT + Apilio applet templates: expanding list with links
