As an Apilio user, we know that you love home automation ![]() . If you have been experimenting and automating stuff for quite some time now, you might have encountered situations where you’d like to have more control when it comes to running (or not) a specific automation. That’s when Apilio’s execution modes come in! With Apilio, you have the option to configure your logic so that you can step into the automation flow and cancel it if you’d rather not execute it at this time. You can find this setup in your Logicblock:
. If you have been experimenting and automating stuff for quite some time now, you might have encountered situations where you’d like to have more control when it comes to running (or not) a specific automation. That’s when Apilio’s execution modes come in! With Apilio, you have the option to configure your logic so that you can step into the automation flow and cancel it if you’d rather not execute it at this time. You can find this setup in your Logicblock:
When a logicblock is evaluated, it will result in either a positive or a negative result: either your conditions are met or not. For both these outcomes, in Apilio you have the option to configure separate action chains. An action chain is simply a list of Tuya (Smart Life) and/or IFTTT actions in a certain order.
For example, you could have a list of actions that turn on your robot mower, then the watering system for the garden for a specified time, and finally turn everything off and close the garage.
Let’s see how actions like these can be executed with Apilio:
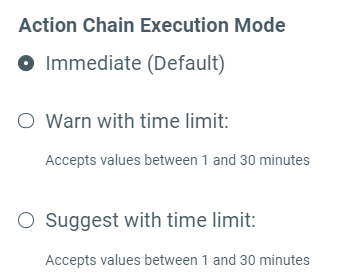
 “Immediate” execution mode
This is the default mode in Apilio, and it is usually the only option available in most automation platforms and systems.
You should choose this execution mode for automations that are run very frequently, and when the consequences of the odd unwanted execution are insignificant. For example, a light bulb turning on at the wrong time because of Daylight Savings Time changes.
In this mode, Apilio will execute all the actions in the action chain in the established order, without any intervention on your part. You can’t stop the actions from being started once the Logicblock is triggered and the Conditions are met.
 “Warn” execution mode
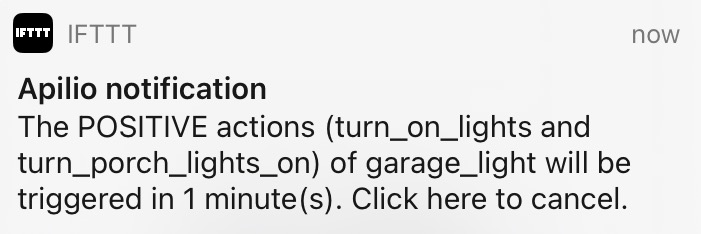
In this mode, Apilio will send you an actionable notification that contains the warning and the ability to stop the action chain from being started, should you want to. Apilio will be on stand-by for a time you specify and, once elapsed, it will run the actions as usual.
This mode is perfect for all automation tasks that do not happen too often, shall normally run without confirmation, but which could be unsuitable in some circumstances and you want to have the option to stop them.
- If you have no actions configured in the action chains (either positive or negative) you will not get a notification
- Actions waiting in the queue until the stand-by time is up will be cancelled if new actions for the same logicblock are queued up.
 “Suggest” execution mode
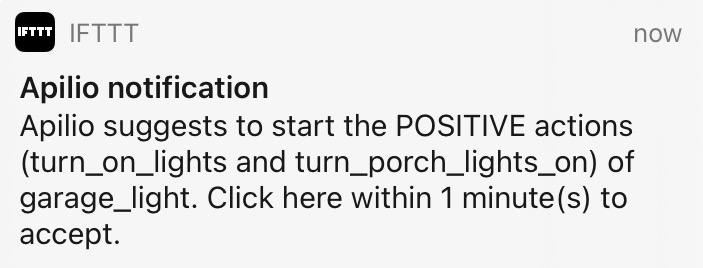
In this mode, Apilio will send you an actionable notification to suggest to run some actions, which you can confirm or not. Without your explicit confirmation, nothing will be triggered.
This mode is handy for automation tasks that will bother you quite a bit if they run under the wrong circumstances, and therefore want to have the final word and manually allow Apilio to continue with the execution.
- If you have no actions configured in the action chains (either positive or negative) you will not get a notification
Setup your Logicblock and your IFTTT applet to receive “warn” or “suggest” notifications
1) Configuring the logicblock to use special execution modes
- Open the Logicblock that you want to configure in edit mode
- Find the configuration section for advanced execution modes
- In your preferred execution mode (warn or suggest) configure the stand-by time that Apilio will wait for you to respond
2) Setup your IFTTT applet for the notifications
We recommend to use the IFTTT app to retrieve the notifications as push notification, but you can use whatever channel you prefer (see last paragraph).
To get the notifications you need an applet enabled in IFTTT that listens to notifications and forwards it through your preferred channel. You only need one applet to listen to any notifications from any Logicblocks: this means, for example, if you have a Logicblock that uses “warn” and a different one that uses “suggest”, you don’t need two applets.
 Receive a push notification with an actionable notification from Apilio (all ingredients pre-configured, ready to go!)
- Receive a customized push notification with an actionable notification from Apilio (this one let’s you build your own message with the available ingredients).
3) Using the IFTTT app to receive notifications
If you enable one of these applets, you’ll receive the notifications (like the images I’ve shown above) via your IFTTT app where you can react to them with a simple tap. For that to work you need to have the IFTTT app (iOS or Android) installed and logged in.
4) That’s it
You can test the notification by opening a Logicblock with an advanced execution mode in view mode and click the “Test now” link.
![]()
(Advanced Apilio) Writing your own custom notification
If you want to receive the notifications in any other app (e.g. Skype, Slack, Facebook Messenger, …) you can of course build your own applet. You can choose from list of ingredients to configure your custom message:
- {{CreatedAt}}: the time when the event was received by IFTTT
- {{NotificationTitle}}: the title of the notification sent by Apilio
- {{NotificationText}}: the message sent by Apilio
- {{ActionableUrl}}: the link where you need to tap to accept or stop the execution of your logic
- {{LogicblockName}}: The name of your Logicblock
- {{ProposedActions}}: this is the list with the names of the actions that are due to be executed
- {{LogicblockResult}}: either positive (if your conditions were met) or negative (if they were not). This tells you which action chains will be executed.
- {{StandbyTime}}: this is the time you have configured in the Logicblock that Apilio will wait for you to react before doing anything.